


[vc_row][vc_column width=”1/1″][vc_column_text]Always make sure that you have jumper cables with you when you are driving no matter how well you think you know your own car. Being a beginner at driving like most other teens, you are going to run into problems with your car you don’t know how to handle. Any problem can be fixed as long as you carry around the proper tools. Follow these steps below to safely jump start your car if the battery dies or will not start.
Step 1: Always inspect your cables before you use them. If they are wet, tattered, torn, or have missing coating around the cables, DO NOT USE THEM.
[/vc_column_text][/vc_column][/vc_row][vc_row][vc_column width=”1/1″][image_with_animation image_url=”6803″ alignment=”center” animation=”Fade In” img_link_target=”_self”][/vc_column][/vc_row][vc_row][vc_column width=”1/1″][vc_column_text]Step 2: After you have carefully inspected the cables, lay them out on dry ground making sure the ends do not touch.
Step 3: Also make sure that the cars are close but not touching, they are turned off, and in neutral or this could result in failure to jump start the car
[/vc_column_text][/vc_column][/vc_row][vc_row][vc_column width=”1/1″][image_with_animation image_url=”6804″ alignment=”center” animation=”Fade In” img_link_target=”_self”][/vc_column][/vc_row][vc_row][vc_column width=”1/1″][vc_column_text]Step 4: Attach the red (positive) clamp to the positive terminal of the working car battery first and make sure it is properly attached and will not fall off. This is important if you value your life
[/vc_column_text][/vc_column][/vc_row][vc_row][vc_column width=”1/1″][image_with_animation image_url=”6807″ alignment=”center” animation=”Fade In” img_link_target=”_self”][/vc_column][/vc_row][vc_row][vc_column width=”1/1″][vc_column_text]Step 5: Repeat the step above on the car with the dead battery this time; again make sure the clamp is not going to fall off.
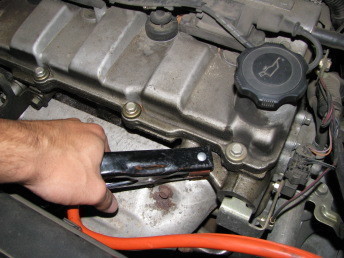
[/vc_column_text][/vc_column][/vc_row][vc_row][vc_column width=”1/1″][image_with_animation image_url=”6806″ animation=”Fade In” img_link_target=”_self”][/vc_column][/vc_row][vc_row][vc_column width=”1/1″][vc_column_text]Step 6: Attach the black (negative) clamp to the remaining negative terminal on the working car battery and make sure the end is properly secure.
[/vc_column_text][/vc_column][/vc_row][vc_row][vc_column width=”1/1″][image_with_animation image_url=”6808″ alignment=”center” animation=”Fade In” img_link_target=”_self”][/vc_column][/vc_row][vc_row][vc_column width=”1/1″][vc_column_text]Step 7: Attach the other black (negative) clamp to any solid piece of metal under the hood. Like a bolt or screw.
[/vc_column_text][/vc_column][/vc_row][vc_row][vc_column width=”1/1″][image_with_animation image_url=”6812″ alignment=”center” animation=”Fade In” img_link_target=”_self”][/vc_column][/vc_row][vc_row][vc_column width=”1/1″][vc_column_text]A good way to remember these steps is “positive to positive, negative to ground,” ground being any piece of metal.
Step 8: Start the engine of the car with the good battery first and let it run for a few minutes.[/vc_column_text][image_with_animation image_url=”6814″ alignment=”center” animation=”Fade In” img_link_target=”_self”][/vc_column][/vc_row][vc_row][vc_column width=”1/1″][vc_column_text]Step 9: After you have let the engine of the good car run for a while go ahead and start the engine to the dead car and if it starts almost immediately, let it run for a few minutes. If it does not start the first time then wait a few minutes and try again. If it still will not start, call a tow truck.
Step 10: Once the cars are running you will need to take the clamps off in the reverse order that you put them on. Starting with the clamp attached to ground you will need to go to the other black clamp of the good battery, to the red clamp on the bad battery, and then the red clamp on the good battery.
Make sure you do not let the clamps touch after you have taken them off and do not let them touch water or metal, They will still be hot and have electricity running through them making the wrong move could cause you to be electrocuted.
Step 11: Once you have gotten the car running, do not turn it off immediately (or if you absolutely need to) it may result in the battery dying again. Drive directly to an autoparts store and have your battery checked out. Some places like Autozone, O’Reilly and Advanced Auto Parts, will run a test on your car battery for free.
[/vc_column_text][/vc_column][/vc_row][vc_row][vc_column width=”1/1″][vc_video link=”http://youtu.be/g8YD27xSNAo”][/vc_column][/vc_row]