


Quarantine cardigan
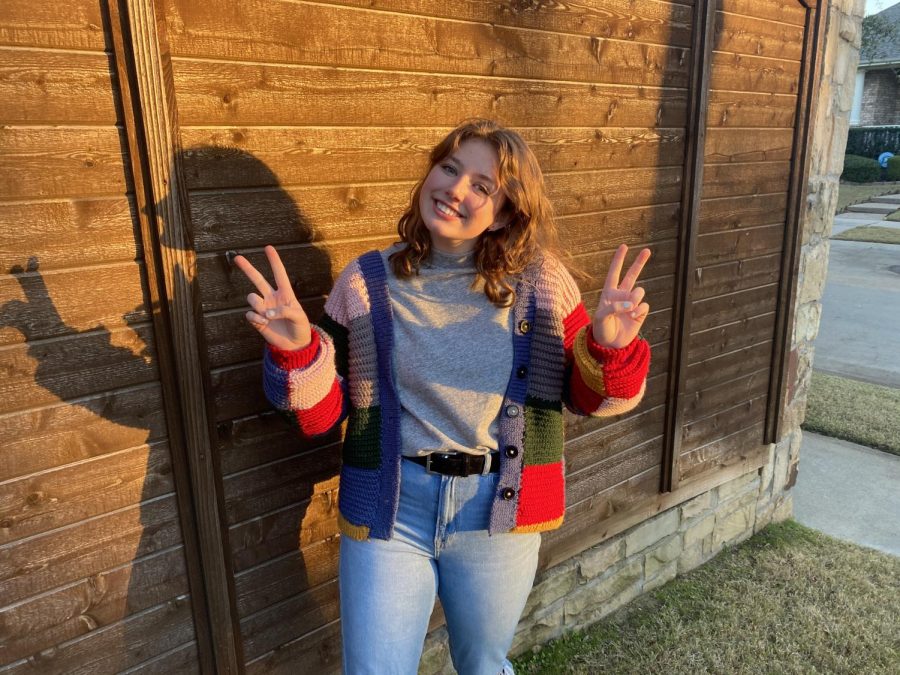
photo by Ava Knauff
Back in February of this year, Harry Styles wore a colorblock cardigan by JW Anderson to a rehearsal for NBC’s Today Show. Since then, the cardigan has blown up across all media platforms as people try to recreate the $1,890 cardigan during their empty hours of quarantine. I watched countless TikToks and searched Etsy, only to find expensive dupes. I took it upon myself to learn to crochet and make the cardigan — and what better time to do that when I am stuck at home while my family is sick?
The first thing I had to do in order to fulfill my goal of creating this cardigan was learn how to crochet and put together a plan. I watched a few YouTube videos of others with a similar goal and put together a blueprint of what I needed to make my own sweater. I decided the cardigan would consist of a total of 54 squares: 42 20×20 squares, six 19×20 rectangles and six 18×20 rectangles. After figuring out exactly what I needed to make, and what amount I needed, I bought all the supplies. I ended up ordering size four medium weight yarn from JOANNs along with buttons and a 5 mm crochet hook. While I waited for my supplies to come in, I watched a YouTube video about how to make a single crochet and practiced making small patches with the yarn and hook until I had perfected the stitch.
I began making the single-stitch patches for my cardigan when all of my supplies came in. It took me six days of crocheting while watching “Queer Eye,” Cody Ko and my teachers’ lectures to finish all 54 patches. The first couple of patches I made were not very pretty, even though I had practiced, but as I worked my way through the multitude of crocheting I had to complete, my patches became more and more uniform. The hardest part of making the patches was honestly the patience I had to possess and the hand-cramping. Once again, after getting through the first few patches, my hands became used to the pain and I was able to work a little faster.
The next step in creating this cardigan was to make the ribbing to go along the bottom and sew all the squares together in the pattern from my blueprint. I began by sewing the squares together for the back so I knew how long to make the ribbing. I created a rectangular panel for the back and two side L-shaped panels for the arms and then sewed them together. I then made all of the yellow ribbing to go along the bottom by following a slip-stitch ribbing tutorial from Marly Bird on YouTube. The one thing I would’ve changed about the ribbing is I wish I made it a little thicker, because while it looked fine, I think it would’ve looked better with a wider ribbing. I finished up this part by sewing the yellow ribbing onto the bottom of the back and arm panels and moved on to making the sleeves.
For the sleeves, I wanted a tapered effect, so I sewed four rows with the width of each row decreasing. Once I had sewn all the patches together, I wrapped the sleeve and sewed it one long spiral hem. I then faced my hardest task: attaching the sleeves onto the back and side panels. For some reason, this part was the most confusing and difficult step to accomplish. Maybe it was rough because I was running out of patience, or maybe it was because I had to sew in a very awkward position. Whatever it was, it made this step very onerous. I made it through though, and by that point I had completed the bulk of work. All I had to do was make the front ribbing, the cuffs and sew the buttons.
I chose to make the front ribbing after sewing everything else together to make sure it was the right length. I followed the same slip knot ribbing technique as above, but I added horizontal buttonholes which required me to watch yet another YouTube video. For this ribbing, I made it a little wider than the bottom ribbing and in the color blue to add more color-blocking to the cardigan. I then made the cuffs which I made to fit pretty tight around my wrist so that the sleeves puffed out a little. After all of that, I sewed my finishing pieces onto the cardigan, and I felt at peace having fulfilled my goal.
Overall, though many mistakes were made, and at times it felt as though I would never finish the sweater, the experience was valuable. Not only did I learn how to crochet and make a pretty cool cardigan, but I also practiced my patience and was able to fill my time in solitude with a fun craft. If you are going to make this, or any other sweater, I would recommend thoroughly researching whatever craft you are going to make before you start. While this step may seem pretty obvious, I did not do as much research as I should have due to my ego which led to many accidents whilst I was crocheting.
Senior Kate Knauff is the news section editor and this is her third year on staff. She enjoys drinking coffee, hanging out with her friends and watching...


![Junior Chase Harris watches JJ Hatcher’s family being recognized on the field. Harris and Hatcher were close friends, playing baseball together since they were kids and playing football together in high school. “[The game] makes me sad,” Harris said. “But it definitely feels really good because [JJ] will be there in spirit and be with us, cheering us on and running alongside us.”](https://www.hebronhawkeye.com/wp-content/uploads/2023/08/IMG_2267.JPG_YES-600x400.jpg)